
Workspace Edition
Workspace tutorial
https://www.amcad-engineering.com/02-whiteboard-workspace-intro/
Workspace layout
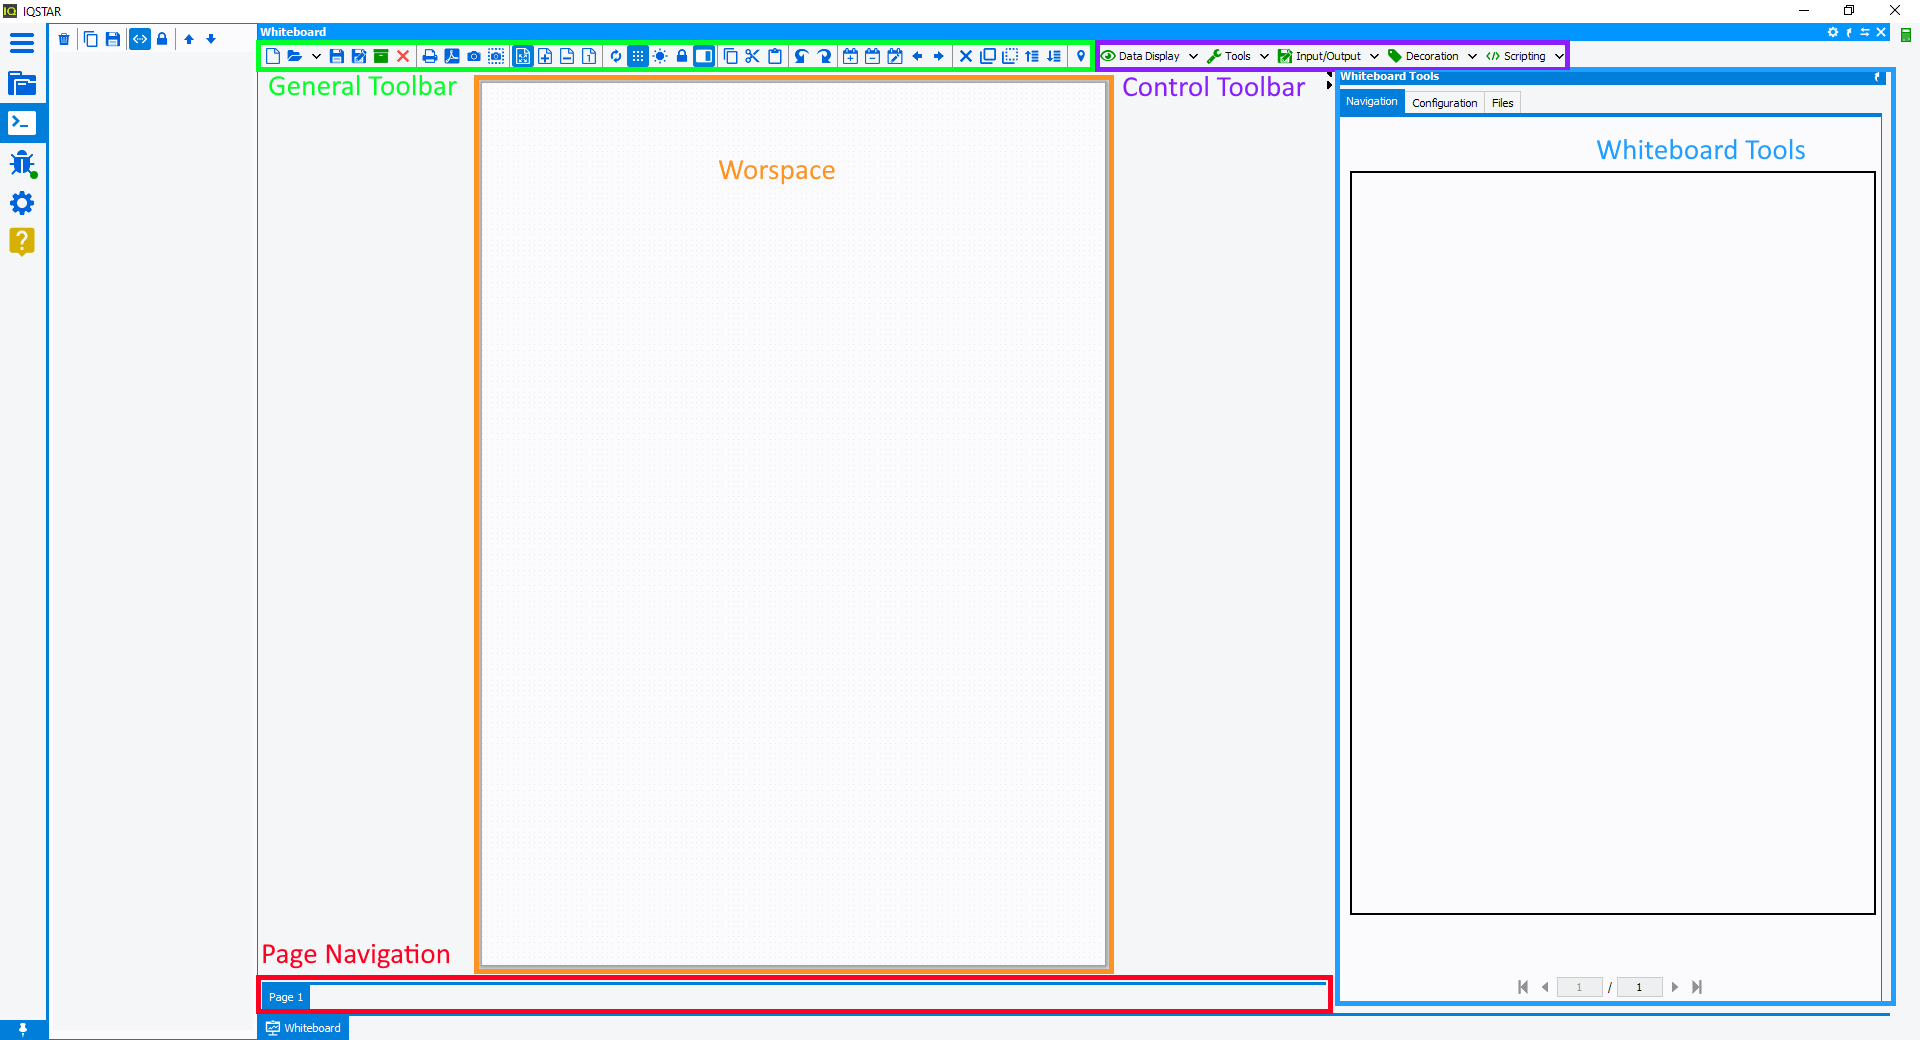
The workspace interface is devided into multiple sections:
- General Toolbar : common tools to manage the workspace
- Control Toolbar : necessary controls to build, filter or extract data from measurement files
- Whiteboard Tools : Workspace navigation; control configuration and workspace file management
- Page Navigation: located at the bottom of the workspace. It allows setting and configuring different pages and navigating from one page to another
- Workspace: section where to display graphs, tables and all information necessary for the report generation
General Toolbar
 Start a new workspace
 Open an existing workspace (*.iw) using the
browser or use the arrow to select a recently opened workspace
Open an existing workspace (*.iw) using the
browser or use the arrow to select a recently opened workspace Save the current workspace
 'Save as' save the workspace under another
name
'Save as' save the workspace under another
name Deploy the workspace (available with
Whiteboard Editor options only)
Deploy the workspace (available with
Whiteboard Editor options only) Close the opened workspace
 Print all the pages of the workspace
 Export and save all the pages in *.pdf
format
Export and save all the pages in *.pdf
format Copy the entire active page to clipboard
  Copy the active graph to clipboard
 Expand the page to fit the screen
 Zoom-in by steps (equivalent of SHIFT + Mouse
Wheel)
Zoom-in by steps (equivalent of SHIFT + Mouse
Wheel) Zoom-out by steps (equivalent of SHIFT + Mouse
Wheel)
Zoom-out by steps (equivalent of SHIFT + Mouse
Wheel) Zoom to scale 1:1
 Refresh the workspace
 Enable/disable background grid
 Highlight all controls present on the workspace
(independantly of their visibility)
Highlight all controls present on the workspace
(independantly of their visibility) Lock the page (Viewer configuration)
 Show/Hide the option panel
 Copy selected control (Shortcut:
Ctrl+C)
Copy selected control (Shortcut:
Ctrl+C) Cut selected control (Shortcut:
Ctrl+X)
Cut selected control (Shortcut:
Ctrl+X) Paste (Shortcut:
Ctrl+V)
Paste (Shortcut:
Ctrl+V)
 Undo action (Shortcut:
Ctrl+Z)
Undo action (Shortcut:
Ctrl+Z) Redo action (Shortcut:
Ctrl+Y)
Redo action (Shortcut:
Ctrl+Y)
 Add a new page to the workspace
 Remove active page from the workspace
 Customise page (page name, orientation and
paper size, refer to Page Navigation)
Customise page (page name, orientation and
paper size, refer to Page Navigation) Previous page
 Next page
 Delete active control
 Select all controls
 Deselect all controls
 Shift selected controls to upper layer
 Shift selected controls to lower layer
 Locate a specific control. When slected, the
list of all controls in the workspace are displayed to choose from.
Locate a specific control. When slected, the
list of all controls in the workspace are displayed to choose from.
Whiteboard Tools
- Navigation

This section represents a preview of the workspace. The black frame represents the visible section of the page.Using the mouse left-click, move the frame to the region of interest. Navigate between pages using the panel shown below:
- Configuration
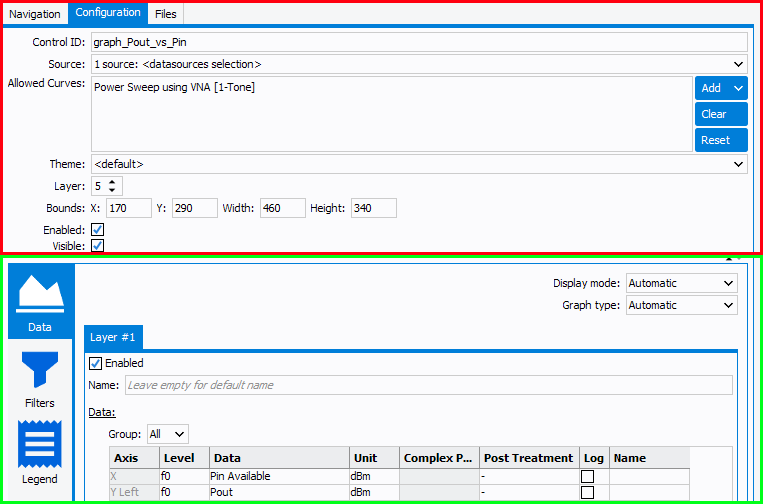
This panel is used to configure selected controls. It is divided in two sections:- Common configuration
This section is common for all controls and refers to the upper part of the configuration panel (in red above).
- Control ID: unique identifier of the control. The control ID can be customized by the user. Special characters are not allowed except for "_".
- Source: the source of the data used to feed the
control. There are two possibilities:
- datasources selection: all curves from datasource (default)
- Control ID: from another control ('filter', 'extractor', 'stacker', ...) that exports only desired curves. Note that Export controls, Initialization Script controls and Function controls cannot be selected as sources.
- Allowed Curves: Type of curves used in the control.
It's possible to have more than one type.
Three buttons are available to manage the allowed curves. The Clear button removes all curves. If specific curve types are selected in the list, the button is then renamed Remove and will then remove only selected ones. The Reset button will automatically choose allowed curves regarding the type of input data. It is usefull for straight forward applications. The last button is named Add and is used to choose the type of curves to insert in the section, there are multiple available types :
- IQSTAR Curves :
- Power sweep using power sensor :
- Modulated Power Sweep :
- Video bandwidth using Power Sensors :
- Power sweep using VNA :
- Video Bandwidth using VNA :
- IQSTAR Trace Curves :
- AM to AM Trace :
- AM to PM Trace :
- CCDF Trace :
- Spectrum Trace :
- Trace I/Q :
- I(V) Curves :
- I(V) Trace Curves :
- S-Parameters Curves :
- Large Signal Curves :
- Large Signal Impedance Sweep :
- Maury LP/Sp File :
- Large Signal power Sweep :
- Maury SPL File :
- Maury SWP File :
- Other :
- Generic :
- Vision Simulation :
- Any : adds all curves present in the category
- IQSTAR Curves :
- Theme: theme of the control. By default, the theme of the application is used
- Layer: position of the control in layer stack. 0 for background and higher values for the foreground layers. In case of element supperposition, the one with the highest layer number will be on top and selectable.
- Bounds - Width - Height: location and dimension properties of the control. The origin (X,Y) = (0,0) is at the top left. X are increasing going on the right, Y are increasing going to the bottom.
- Enabled: When Unchecked, the control becomes idle and no information can be extracted (no longer be used as parent to another conrol).
- Visible: Hide/Unhide the control in the workspace
- Control configuration
This part is unique for each control and refers to the lower part of the control configuration panel (green section in the figure above). It is used to configure the control. More information about control configuration in section: Control Toolbar.
- Common configuration
- Files
 This table displays all files attached to the workspace: images (*JPG, *.PNG...); measurements files (*.S2P, *.IMX...) and setups (*.SET). Columns can be sorted and filtered.The Image control can directly use these files.In the right bottom of the panel, there is a toolbar to manage files:
 Add new files in the workspace (drag
and drop is also available)
Add new files in the workspace (drag
and drop is also available) Remove selected files from the
workspace
Remove selected files from the
workspace Extract selected files out of the
workspace
Extract selected files out of the
workspace Open measurement files in the Data
Manager
Open measurement files in the Data
Manager
Page Navigation

- Delete page: remove page from workspace
- Edit page: open a menu to configure the page:
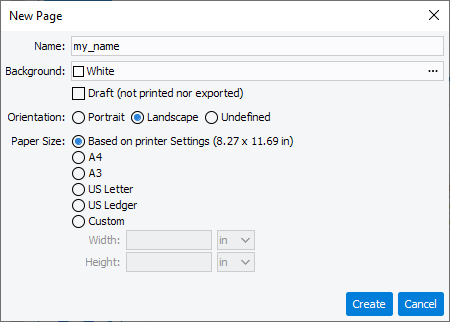
- Name: name of the page
- Background: Define background page color
- Draft: if checked, the page will be considered as draft, and will neither be visible in viewer mode nor exported to pdf
- Orientation: orientation of the page
- Paper Size: dimensions of the page